In the last tutorial we set up the base Docker development Image that we will use to develop Azure Function Applications.
Function Apps are serverless services that can run your code and then scale down so that you can fully optimise your cost to productivity ratio in Azure. For more details and for reference throughout this tutorial checkout the Microsoft documentation on Azure Functions
Microsoft provides a handy local development tool so that you can develop Function Apps locally, which can be exceptionally useful when you need to debug quickly and save cash before deploying to the cloud.
In Part 1 of this series, the example Docker Image we created contained the setup for this local development tool. You can verify it has installed correctly using the following command once we have a terminal on the container,
func helpAt this point, if you wanted to, you can now quickly put in an example Azure Function and run it locally with a simple func start command. However, you may get some warnings about storage, and you also wont be able to utilise some of the more advanced features of Function Applications.
By the end of this tutorial you will,
- Explore developing Azure Functions and Azure Durable Functions
- Learn how to emulate Azure Cloud Storage locally using Docker.
- Deploy a locally hosted Durable Azure Function
This tutorial will use Python, however Function Apps support a wide variety of programming languages if you prefer to use another.
This tutorial also assumes you have worked with Azure Functions before, if you haven’t try out this tutorial from Microsoft to get started.
Functions Vs Durable Functions
Ignoring all the different billing tiers of Azure Function Application you can get, there are two main types of Azure Function.
- Azure Function Applications
- Durable Azure Function Applications
Another thing to keep in mind is Azure Functions are serverless, they lean on Azure Storage account as a secondary resource to actually store the source code they run and artefacts from runtime when they execute.
One of the primary limitations when using an Azure Function is its compute, in both the amount of compute you have and how long you have that compute for.
Durable Functions are a way to get around this by dividing up workloads into their own dedicated functions to share the load and keep overall costs to a minimum without having fork out for a tier with higher compute power.
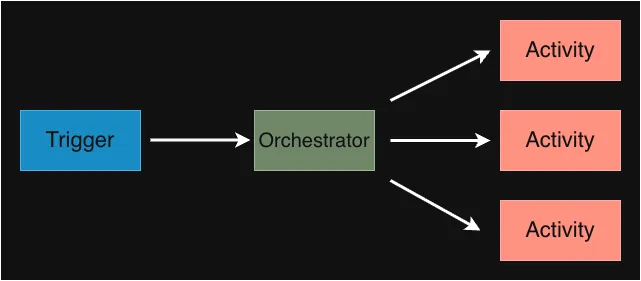
There are three primary components of a Durable Function.
-
The Trigger - A trigger is the exact same as a regular Azure Function, it can be anything that will trigger the Functions code, including but not limited to, HTTP events, Schedules and other events from Azure resources.
-
The Orchestrator - This is the component that defines what work needs to be done and distributes it out to the Activity Functions that will actually do the work.
-
The Activity - This component does heavy lifting, spinning up, executing and passing back its state or completed data to the Orchestrator. An Orchestrator can spin up as many of these as needed.
As mentioned previously, Azure Functions require a Storage Account to operate. This is especially important for Durable Functions, which use several Storage Account features to persist and track orchestration state, activity execution, checkpoints, and messages, enabling all components to coordinate reliably and work together seamlessly. For full details on this check out the Microsoft Documentation
We could just spin up some cloud storage and point our locally developed Function at that, but this defeats the purpose of local development! Luckily there is a solution.
Adding Local ‘Cloud’ Storage
Microsoft has anticipated Developers desire to debug and develop code locally and have provided an open source tool to emulate Azure Storage, known as Azurite
This tool is written in Node.js but also comes pre-packaged for us in a Docker Image so we can quickly and easily deploy it to our develpment stack we started before.
To add this to the stack, simply edit the docker-compose.yaml file that we have started back in Part 1.
Your docker-compose.yaml file should now look like the one below,
services:
    dev-container:
        image: my-dev-img
        container_name: example-dev-container
        volumes:
            - .:/development
        networks:
            - devnet
        tty: true
        stdin_open: true

    dev-azurite:
        image: mcr.microsoft.com/azure-storage/azurite
        container_name: dev-azurite
        ports:
            - "10000:10000"
            - "10001:10001"
            - "10002:10002"
        command: azurite --blobHost 0.0.0.0 --queueHost 0.0.0.0 --tableHost 0.0.0.0
        networks:
            - devnet

networks:
    devnet:
        driver: bridge
The key changes we have made in this file from Part 1 are,
- We have created a Docker Network and added it to our
dev-conainer - We have created an Azurite Container called
dev-azurite- Exposed ports
- 10000 for Blobs
- 10001 for Queues
- 10002 for Tables
- Ran a command to start Blob, Queue and Table hosts on the Container
- Exposed ports
Once this file is in place, you can bring it up on Docker using the following command
docker compose -p azure-dev-stack up -dNote that this time we have added -p which stands for ‘Project Name’ this will name our stack of Docker Containers so that they are easier to track.
Homing in the Config
Now that our Containers are up, its time to connect to the Container as we did before in Part 1 of this series by attaching to the running Container using VS Code Containers extension.
Once connected create a new file called local.settings.json and put the following content in it,
{
    "IsEncrypted": false,
    "Values": {
        "FUNCTIONS_WORKER_RUNTIME": "python",
        "AzureWebJobsStorage": "UseDevelopmentStorage=true;DevelopmentStorageProxyUri=http://dev-azurite"
    }
}
This local settings config file will be used by the Func utility to configure the local running of your Azure Function.
As this is a local development environment, we set encryption to false (as its this is a development enviorment).
We also state the worker runtime, in this case Python.
Finally, most importantly we instruct Func to use our local development storage, and pass it the URI for our Azurite Docker container.
⚠️ WARNING: The
local.settings.jsonhas been included in this project / GitHub repository for the sake of instruction. Never commit this file to your projects and always include it in your.gitignoreand.funcignore
Bringing it Together
Now that everything is set up, we can get developing!
This tutorial will use Python, and if you have done any amount of Python development you will appreciate it can be quite annoying juggling Python versions, libraries and virtual environments.
To get around this, I recommend using UV from Astral. This is a nice lightweight tool that makes doing the above a lot easier, and I made sure it was installed in the example Docker Image used in this tutorial. However, if you are comfortable with Python and getting a virtual environment set up, using this is optional.
Python Environment
It is important when developing with Python to create a virtual environment before beginning a project and install any libraries you need within this virtual environment.
Using UV you can do this with the following commands.
# Creates Virtual Environment with Python 3.13
uv venv --python 3.13 \

# Activates venv
source .venv/bin/activate \

# install required packages
uv pip install azure-functions azure-functions-durable requests
Its also a good time at this point to make sure that within your Container attached VS Code window, that the Python VS Code extension is installed.
This will allow you to get syntax highlighting and can let you point VS Code at your virtual enviorment to check for missing libraries.
The code
For this tutorial I will provide an example Durable Function Application for you to test.
This application takes a HTTP POST request with a payload of an array of URLs. This array will be orchestrated into different actions to check if each URL is reachable.
Save the below in a file called function_app.py
import azure.functions as func
import azure.durable_functions as df
import requests

myApp = df.DFApp(http_auth_level=func.AuthLevel.ANONYMOUS)

# HTTP-triggered starter for the durable orchestrator.
# Expects a JSON body like: { "urls": ["https://example.com", "https://contoso.com"\] }
@myApp.route(route="orchestrators/{functionName}")
@myApp.durable_client_input(client_name="client")
async def http_start(req: func.HttpRequest, client):
    function_name = req.route_params.get('functionName')
    try:
        body = req.get_json()
    except ValueError:
        body = {}

    urls = body.get("urls") or []
    if not isinstance(urls, list):
        urls = []

    instance_id = await client.start_new(function_name, client_input={"urls": urls})
    response = client.create_check_status_response(req, instance_id)
    return response

# Orchestrator that iterates through a list of URLs and delegates reachability checks to an activity.
@myApp.orchestration_trigger(context_name="context")
def check_urls_orchestrator(context):
    input_data = context.get_input() or {}
    urls = input_data.get("urls") or []
    results = []

    for url in urls:
        result = yield context.call_activity("check_url", url)
        results.append(result)

    return results

# Activity that performs a simple HTTP request to determine whether the URL is reachable.
@myApp.activity_trigger(input_name="url")
def check_url(url: str):
    try:
        response = requests.get(url, timeout=10)
        reachable = response.status_code < 400
        status = "available" if reachable else "not available"
        return {"url": url, "available": reachable, "status": status, "status_code": response.status_code}
    except requests.RequestException:
        return {"url": url, "available": False, "status": "not available"}
Testing
Now that everything is ready, with the Python venv activated and the function_app.py and local.settings.json in place. We can now start our local function with the following command;
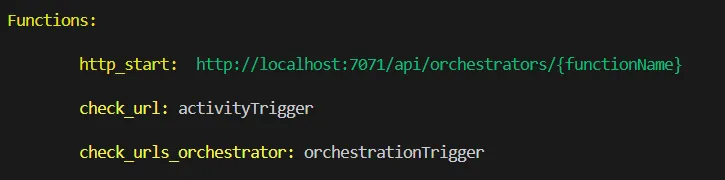
func startYou should now see the output Functions that are now running locally and VS Code should expose the port 7071 on your host so that you can access the Function App.
To activate our function we need to send a POST request with a URL payload to the http_start function in this case the URL will be;
http://localhost:7071/api/orchestrators/check_urls_orchestrator
To do this I reccomend using a tool like Postman which can be installed on VS Code as an extension, or as a desktop application
Simply paste the URL above into the interface for Postman, set the body of the request to raw JSON, and populate it with some URLs to check.

Here is an example payload
{
    "urls": ["https://example.com", "https://invalid.example"]
}
Next simply send the payload and await the response.
The response will initially look quite messy, what we get is a series of URIs that correspond to data from our Durable Function, the one where we get the results of the execution is statusQueryGetUri.
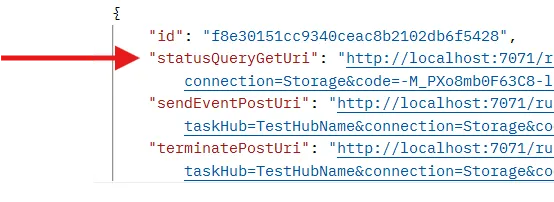
Simply click on this URL and you will be directed to the results,
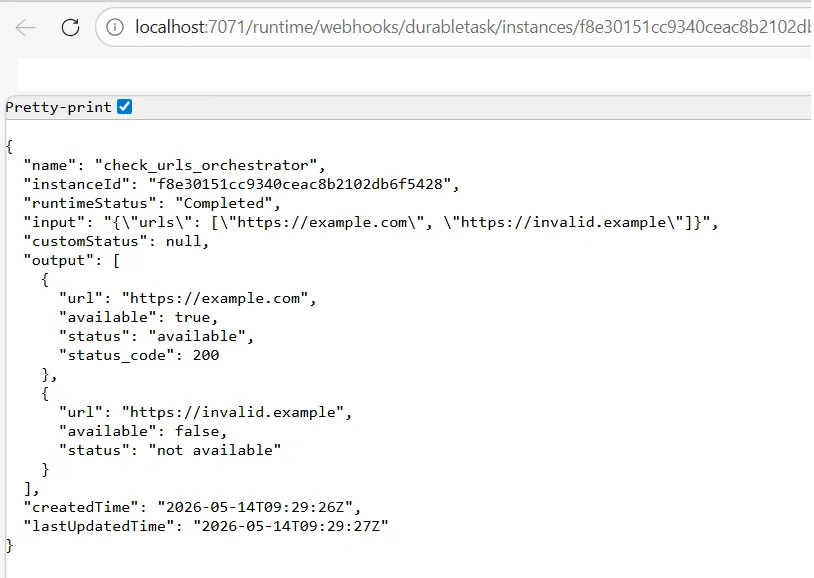
Thats a wrap ! You have successfully set up a local Docker development enviorment for developing Azure Durable Functions.
As per usual, if you want the files used in this project for your reference, you can find them here on my GitHub